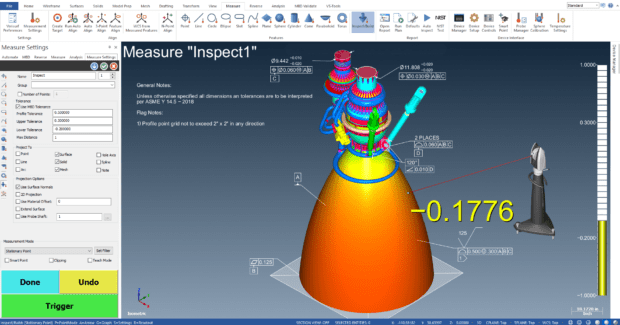
Verisurf Software 2022 Release Includes MBD for Polygonal Meshes
Verisurf 2022 supports Model-Based Definition (MBD) for polygonal meshes, enabling users to create and inspect using intelligent meshes.
Posted: March 28, 2022
(Anaheim, CA) Verisurf 2022 is the latest release of the popular universal measurement software for automated quality inspection and reporting, scanning, reverse engineering, and tool building. The new release builds on Verisurf’s advancements in performance, including the ability to process millions of measured points per second; fast and easy inspection planning; and open platform compatibility, whether in the quality lab, on the shop floor, or in the field.
One of the new features included in the release, Model-Based Definition (MBD) for meshes, enables users to create intelligent polygonal meshes for part inspection. MBD mesh files can now serve as the authority, in place of a CAD model, to inspect additive manufactured parts, saving considerable time and resources. Verisurf is the only measurement software built on a CAD platform that works with any CAD file and all portable arms, laser trackers, laser scanners, and both manual and programmable CMMs.
“At Verisurf, we are actively involved with our customers, listening to their feedback and helping them solve measurement challenges. This interaction is what drives our ongoing development of the Verisurf open platform, making us the single most diverse and powerful software to drive all measurement and inspection applications across the manufacturing enterprise,” said Ernie Husted, President, and CEO, of Verisurf Software, Inc.
Verisurf 2022 has many new and powerful features to support all measurement types, including portable, laser scanning, manual and programmable CMM applications:
Portable Arms and Trackers
- Quick Drift-Analysis
Quickly determines whether the part, tool, or device has moved. The most common causes for movement are temperature change, harmonics, and physical contact. - Enhanced Alignment Routines
Expanded controls enable interactive modification and update of the alignment settings, resulting in faster alignment and consistent results. - Fast Point Cloud Processing
The real-time scanning acquisition rate now exceeds 2 million points per second. - Clipping Plane for Scanning Devices
Real-time point–cloud clipping provides cleaner scan data, resulting in less editing to remove unwanted data. - 2D Cross Section Analysis
Visualize the profile–deviation outline and tolerance bands in the graphics window. - Projection Filter for Point Clouds and Meshes
Enables rapid removal of erroneous data using filter zones based on the CAD geometry. - Model-Based Definition (MBD) for Meshes
Create intelligent meshes that can be used to inspect additive–manufactured parts. Extends MBD analysis to meshes, including thickness analysis on measured meshes.
Inspection–Planning and Reporting
- Find or Select Features from the Graphics Window
Quickly search, highlight, and ”go to” features in the Automate Manager and graphics window. - CMM Collision Detection
Simulate CMM paths to detect collisions and perform corrections with dynamic clearance–point editing. - Additional Feature Extraction Options
Use feature zone display and pre-selection of features to fine-tune the extraction of data from the inspection plan. - Auto-Generate Path for Features
In Automate mode, the CMM path is automatically generated as features are added to the plan. - Adaptive Scanning for CMMs
Senses the location, shape, and form of the component and dynamically adjusts the scan–path to accommodate variations. Enables use of a single program to measure multiple part–configurations.


