Why 5-Axis Metrology is Crucial to Creating a Smart Manufacturing Network
Part complexity, tougher quality requirements, and calls for 100% parts inspection are on the rise, straining the capabilities of conventional 3-axis coordinate measuring machines (CMMs). Adding A and B axes via the industry’s only multisensor probe to a CMM’s X, Y, and Z axes increases surface speed and shortens measurement cycles.
Posted: August 25, 2020
BY MARK GEARDING
In the New Testament parable about the wise man and the foolish man, one built his house on a rock and weathered a storm while the other built his home on sand and witnessed its collapse. This simple story underscores the importance of a good foundation, but the principle also applies to choosing the right coordinate measuring machine (CMM).
Job shops are being asked to process and measure more complex parts amid stricter supply chain quality standards. Calls for 100% parts inspection for new product lines are also on the rise. These and other trends have pushed the CMM into a larger role on the production floor.
Understanding the differences between 3-axis and 5-axis technology and whether or not parts require tactile (touch) or noncontact scanning are crucial for fabrication companies seeking to link machines, intelligent devices, and systems to create smart manufacturing networks.
Until recently, conventional 3-axis CMMs proved largely sufficient; however, legacy equipment is limited in Industry 4.0 and Industrial Internet of Things (IIoT) environments. A 3-axis machine is based around indexing heads or fixed probes that can only collect data by moving three axes. Because flexibility is restricted from 5 to 7 1/2 degrees of polarity, cycle times are slower. Inertial forces created by acceleration and deceleration cycles make the machine error-prone.
Renishaw developed the industry’s first 5-axis touch-trigger probe in 1973. In 2015, the company introduced REVO-2, a multisensor 5-axis measuring head that can accommodate touch-trigger, high-speed scanning, surface finish measurement, and noncontact vision measurement probes.
Recognizing the need for a CMM with the ‘right foundation’ to support Renishaw’s technology, Dayton, Ohio-based AIMS Metrology introduced the Revolution LM and HB CMMs the same year. Fitted with REVO-2, the LM was developed for the laboratory. The HB was the first mobile, 5-axis CMM built to withstand the harsh environment of the shop floor.
“By 5-axis ‘scanning’ we mean the REVO-2 physically glides over the component’s surface finish to collect data points,” says AIMS President Dave Delph. “Noncontact measurement is appropriate if a part’s so small a probe can’t access its features or if the material exhibits deflection due to thinness or is very soft. Tactile inspection is the best approach for most applications because it’s more accurate.”
What You Get With 2 Additional Axes
Because 5-axis technology synchronizes the CMM and the head, the machine is able to move at constant velocity in a single vector while measuring. With a wider bandwidth, the agile, lightweight head easily follows part geometry changes without introducing errors. The result is faster surface speeds and shorter measurement cycles.
Other elements, such as bearing design, also influence accuracy.
A 3-axis CMM uses conventional aluminum air bearings, which usually have several orifices in a pattern across the smooth face of the bearing pad. These openings distribute pressurized air, which gives the machine lift to move without dragging. The downside to this design becomes apparent if the guideway sustains a nick — a common occurrence in a job shop environment — or has a minute imperfection. When the bearing passes over the nick, the interruption in air flow causes the machine to lose lift and dip before it recovers. That small dip can make a big impact on accuracy.
The LM’s bearings use a graphite porous surface. Because air travels through the pores, if the bearing travels over a nick or imperfection, it only loses air at that specific point. It doesn’t bleed or lose air like an aluminum bearing.
In addition, the air pressure of each axis is controlled independently, providing improved lift. The Y axis has two air bearing regulators, one for the drive side with four bearings and one for the outboard leg. This allows the machine to manage lift of the two sides independently. Machines with one regulator tend to yaw (twist or oscillate about a vertical axis) when there’s a lift differential from side to side.
Placing a CMM like the HB on or near a production line for dimensional verification saves substantial time and expense because an operator no longer has to move parts. The machine also is easily moved from location to location, where it can monitor process flow in real time while Renishaw’s 5-axis PH20 quickly obtains high-density points for feature size, location, and form. This gives a manager or machinist accurate and actionable data to act at any point during parts production.
Match Machining Center to Measuring Machine
Three-axis machining centers are being upgraded with 5-axis capabilities to reduce setup time. In a smart factory environment where machines are digitally connected for data collection, it is essential to match 5-axis machining tools with 5-axis CMMs.
Companies using additive manufacturing are also finding uses for 5-axis CMMs. A programmer can print a part and check it right away instead of waiting for a program to be debugged before starting a production run. Build-to-print structural assembly suppliers for the aerospace market, for example, are using CMMs to inspect parts and qualify modifications made to tooling. In addition, CMMs are being used to inspect 3D-printed tools before they’re used on the production floor.
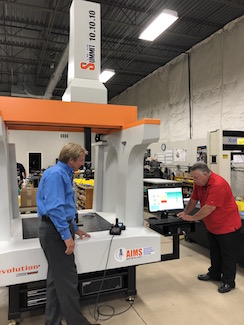
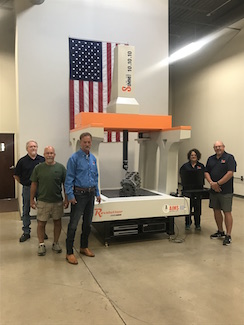
The growing need for high-volume, large-parts inspection prompted AIMS to introduce the Summit 10.10.10 earlier this year. Engineered with a 5-axis REVO-2 dynamic scanning probe and 1-meter-cubed capacity, the Summit provides the industry’s largest workpiece weight of 4,850 pounds (2,200 kg). Unlike the HB, the Summit is stationary for a good reason.
“We wanted to put REVO-2 5-axis scanning and multisensor surface finish measurement, including video probing, into the hands of the operator,” says Delph. “That meant making the structure more robust with a stiffer Z-axis.”
The REVO-2 avoids dynamic deflections because it minimizes machine accelerations while moving the stylus rapidly over the component’s surface. Operators now have access to new ways of scanning such as touch points, circular or helical scans while capturing data on contoured surfaces and edges. The REVO-2 provides measuring speeds up to 500 mm/second and data collection rates of up to 4,000 points per second for increased throughput. Rapid calibration for all positions expands uptime. Infinite positioning and 5-axis motion offer easy access to difficult features while flexible tip sensing aids accuracy and flexibility.
Dual linear motors work off permanent magnets that don’t wear out. Conventional belt and pulley mechanisms have a tendency to break, resulting in costly service calls and extensive downtime. The design minimizes wear and tear for zero maintenance and enhanced uptime.
Unlike granite shop floor machines, the Summit’s polymer-cast base has built-in vibration resistance and thermal stability for longer life and greater accuracy. The CMM uses 110/220-volt outlets, eliminating the need for shop air. In addition to robotic or pass-through conveyor automation, the Summit can be equipped with automatic tool adjustment for tool wear. The Summit supports a wide range of applications for the metal cutting and forming industries and has already been adopted by Honda Transmission Manufacturing of America Inc.
“It’s a game changer for manufacturers,” Delph says.


