High Throughput Automatic Vision Inspection of Repetitive, Larger Parts
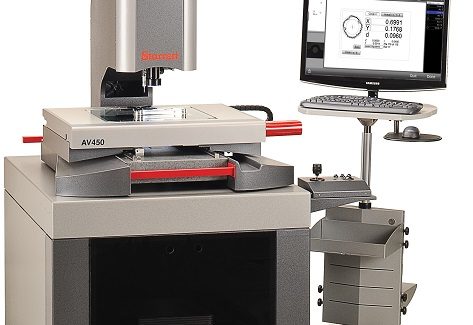
The 3-axis AV450 Automatic Vision System from Starrett is so versatile, accurate and fast that users can cost-effectively achieve high throughput inspection of repetitive, larger parts, as well as routine quality assurance.
Posted: March 25, 2019
Ideal for repetitive, larger part applications as well as routine quality assurance, the versatile, accurate and fast AV450 Automatic Vision System from The L.S. Starrett Company (Athol, MA) is a 3-axis vision system that allows users to cost-effectively achieve high throughput in their inspection process. Featuring a larger XYZ measuring envelope of 18 in x 14 in x 8 in (457 mm x 356 mm x 203 mm), the AV450 has high-resolution video zoom optics and can be pre-programmed (CNC) for repetitive part inspection, or driven manually via a trackball for individual measurements. With its highly stable mechanical design and precision linear bearings, smooth stage motion, maximum performance and throughput is easily attainable. Throughput is further enhanced by either QC5000 or MetLogix™ M3 software that controls video edge detection and multiple-channel fiber optic or LED illumination. Computer-controlled Quadrant (LED) ring lighting, sub-stage lighting, and optional through-the-lens lighting meets the most challenging illumination requirements.
Accuracy of the AV450 is 2.5 + 5L/1000 and reading resolution is 4 µin (0.1µm). The system has a 1.3 mega-pixel color digital video camera, a precision granite base, magnification on a 24 in monitor, 1:1 pixel setting at 37X to 240X with a 6.5:1 zoom and 25X to 300X with a 12:1 zoom. This American-made system has an external motion control unit and includes a Windows®-based operating system with an operator interface via a desktop PC with a 24 in touchscreen monitor, as well as Wi-Fi network connectivity. CAD files can be imported/ exported and reports can be generated and archived. M3 metrology software supports 3-axis measurements and 2D geometric constructs (such as points, lines, angles, rectangles and slots) and corrections for level, skew and datum origin. Touch-screen functionality with a pinch, swipe and touch provides intuitive operation for all users.
Options for the AV450 include a Renishaw touch probe kit, Optimet laser probe, 0.5X, 1.5X and 2.0X auxiliary lenses, an LED dark-field quadrant illuminator and a DXF/ field-of-view option for automatic comparison to CAD files. Other options include a CNC rotary axis fixture, touch probe change rack, calibration standards, part fixtures and workholding devices.
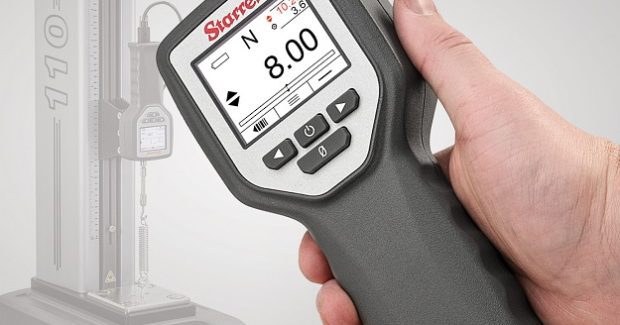
Starrett also offers their DFC and DFG Series of handheld digital force gages for entry-level digital force measurement applications. Optimized for production and quality control testing, these gages are part of the versatile, innovative architecture of the L1 system that is designed for fast, easy-to-use, reliable and repeatable operation. Depending on the series, advanced automatic testing can be attained with the DFC force gage controlling an FMM digital force tester, or basic testing can be performed using the DFG gage. These gages feature an easy-to-view high-resolution OLED color backlit display and auto-off function. A primary and secondary window shows test results and out-of-tolerance results display in red. A simple multi-function keypad has softkeys that are programmable to the most repetitive functions of users. Adjustable sampling rates help capture peak loads and filters can be applied to peak and display values.
L1 digital force gage battery life provides over 30 hours of continuous operation and the device has a USB port for transmitting data to a computer. This gage has a cast aluminum housing with a comfortable grip design for handheld testing, and a metric-threaded top post enables screw-on attachments and clevis adapters that fit hundreds of Starrett test fixtures. “Whether for simple, basic economical testing via handheld gaging, or more advanced testing when mounted on our L1 stands, these innovative digital gages provide the ultimate system in force measurement versatility,” said Emerson Leme, the head of the Metrology Division at Starrett. The DFG basic force gage measures force at an accuracy of better than 0.2 percent full scale. It is ideal for basic handheld tensile and compression testing. Test setup and operation is fast, efficient and easy. Its display shows the test direction and dynamic load during testing. Results are displayed at the completion of testing, including “Pass-Fail” when tolerance is applied. The gage will display statistics when results are saved to its internal memory and it can store up to 50 test results in local memory.
Both DFC and DFG gages are supplied with a complete accessory kit and carrying case that includes hook, notch, chisel and flat attachments, a chisel and point adapter, a 6 in extension rod and a NIST-traceable certificate of calibration. The DFC gage can serve as a universal interface where the user tests and can configure load limits, distance limits, break limits, crosshead travel direction, crosshead speed and more. It features a precise measurement accuracy of 0.1 percent full scale with internal data sampling at 25 kHz. Display resolution is 10,000:1 and the DFC features Bluetooth®, USB and RS-232 communications plus digital I/O. The DFC Series is a revolutionary concept for force measurement via a handheld force gage that can be used as an advanced digital force gage and controller with FMM force testers or as an advanced digital force gage with MTL and MTH manual force testers.
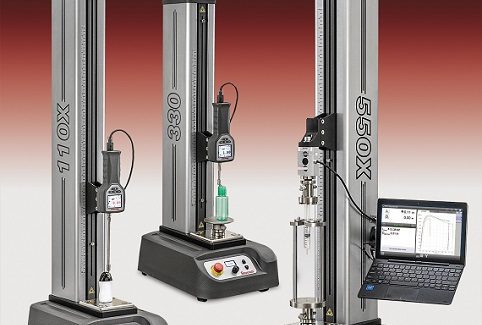
FMM digital force testers are motorized digital test frames used to perform a wide range of basic, high volume in-situ lean manufacturing force testing applications, including tension, compression, flexural cyclic, shear and friction. What makes these digital test frames exceptionally unique is their ability to be used with either L1 software for computer-controlled testing or with a DFC gage that lets users control the speed and travel of the FMM, providing a single operator interface for control and testing. Using a DFC gage on an FMM test frame, load, distance and break limit testing can be performed simply at an economical price and with excellent accuracy of better than 0.1 percent. “FMM Test Frames operate two ways: with our L1 software for shops seeking full computer control in a MS Windows environment, or via our DFC gage mounted on the column for users preferring maximum application versatility and cost effectiveness,” noted Leme.
L1 software offers simple, fill-in-the-blank templates that let users create, perform, measure and analyze their test in seconds and perform limit testing, break testing, constant hold testing, cycle testing and more. Touch screen control simplifies operation and the high resolution display shows results in tabular and graphical formats. Tolerances can be applied for immediate pass/ fail indication. Raw data can be exported to Excel for reporting and statistical analysis. FMM Series Test Frames are available in three force capacities: 110 lbf, 330 lbf and 550 lbf (500 N, 1,500 N and 2,500 N) are furnished in a standard travel length (20 in/ 508 mm) or an extended travel length (30 in/ 760 mm). These test frames feature a small footprint for small work spaces. The frames are just 11 in wide by 16 in deep. All frames have a speed range from 0.02 ipm to 40 ipm (1 mm/min to 1,000 mm/min). Position accuracy on the FMM test frames is better than 20 microns and speed accuracy is better than 0.1 percent at full load and at maximum speed.
Jog keys and an LED display aide manual operation. Adjustable travel limits may be used to prevent over-travel conditions. FMM test frames also feature an adjustable base plate made of cast aluminum for exceptional rigidity and durability. Inspectors may use metric or imperial threaded test fixtures and clevis adapters. The base plate is adjustable so that sample alignment can be performed in seconds without special tools. The mechanical design of the FMM tester incorporates a preloaded, grounded ball screw with a linear rail for precise, repeatable travel. Frames are capable of performing hold tests as well as cyclic testing for up to 27-hour durations. Bench clips are supplied if users want to permanently secure the frame to their work bench. These test frames are CE-compliant and have USB and RS-232 communication. They also have configurable I/O for use with annunciators or other external devices.
The L.S. Starrett Company, 121 Crescent Street, Athol, MA 01331, 978-249-3551, Fax: 978-249-8495, [email protected], www.starrett.com.


