Precision Machining of Spherical Medical Components
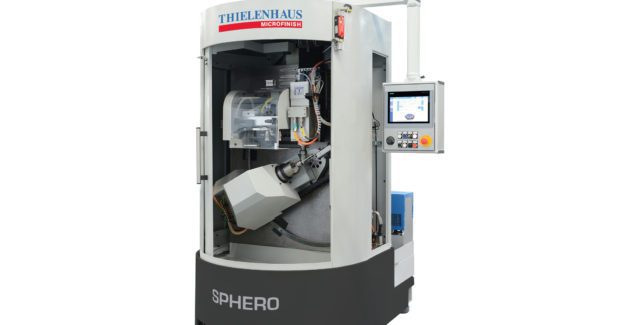
The Sphero from Thielenhaus Microfinish is ideal for absolutely reliable machining of the entire outer surfaces of spheres and the inner surfaces of cups.
Posted: August 27, 2016
The machining of workpieces with spherical forms pushes even the most modern hard turning and standard grinding machines to their technical limits, making great demands on dimensional accuracy and surface finish. For these critical applications, Thielenhaus Microfinish (Novi, MI), a division of Thielenhaus Technologies GmbH (Wuppertal, Germany), has developed the Sphero, a flexible and compact machining solution based on a platform proven in medical technology. This high precision machine tool is equipped with a tool spindle unit that can swivel up to 90 deg, allowing the optimal machining position to be chosen for every process. The clamped workpiece rotates at up to 4,500 rpm. This, in combination with the corresponding form of the Microfinish tools, enables absolutely reliable machining of the entire outer surfaces of spheres and the inner surfaces of cups.
The associated tool unit is arranged vertically and is easily accessible for quick retooling. Due to the integrated tool changer with capacity for up to ten tools, even complex machining processes can be carried out in only one clamping process. If necessary, a polishing process can be integrated following the Microfinish machining process. Workpieces with diameters up to 75 mm can be machined on the Sphero. However, very small tools can also be used, and even thin-walled components can be machined. The machine’s construction is highly space-saving and is characterized by a modern, compact, cylindrical and ergonomic design.
The Sphero can machine the joint heads of wheel suspension and steering components to provide a high level of freedom and movement for the associated assembly units. For valves used to transfer aggressive or very hot media, it can machine the required metallically sealing valve balls and seating rings with a high degree of dimensional and surface accuracy. For axial hydraulic piston pumps that use a spherical sliding surface of only 10 mm diameter at the end of the pump, it can machine dimensions of this component to an accuracy of 1 µm or less to guarantee safe operation at great strain. With this machining concept, surface topography, spherical roundness, spherical diameter and sealing surfaces can be machined and defined contact rations that fulfil tribological requirements are possible.
In only a few installation steps that lasts around ten minutes, the operator can convert the Sphero from outer machining to inner machining, i.e. from a sphere to a sealing ring. The Sphero can make the process even more cost-efficient by substituting the grinding process, where the workpiece enters the machine immediately after hardening and leaves it as a finished component. Operator influence is reduced to a minimum and errors due to repeated handling and clamping are ruled out because the workpiece remains in the clamp until it is completely finished – which drastically increases process reproducibility. By allowing the implementation of several tool qualities, the process can (for example) be broken down into roughening and smoothing. The tool change takes place in eight seconds with the added benefit that the workpiece stays in the clamp. Since the process happens on a self-correcting basis, truing cycles are done away with, meaning better end results can be achieved with short cycle times.
The machine monitors the stipulated parameters itself on an on-going basis and makes any necessary adjustments. This means checking the workpieces via random sample is sensible because the variation in tolerance is so small that they are not measurable in production using conventional measuring means. The differences are detectable only in a measurement room.
Thielenhaus Microfinish, 42925 West Nine Mile Road, Novi, MI 48375, 248-349-9450, Fax: 248-349-9457, [email protected], www.thielenhaus.us.


