How Negative-Stiffness Vibration Isolation Improves CMM Performance in Precision Surface Measurement
High-throughput CMM laser interferometry surface measurement systems
can be negatively affected by plant low-frequency vibrations, which can distort the interferometry measurements and deliver inaccurate readings. Here’s how to prevent that from happening.
Posted: October 5, 2015
Manufacturers need to control processes to produce a consistent, reliable product. Where precision surface engineering is required, surface measurement may be a key part of maintaining control of the process, by checking output to see that the process is not outside of specification.
Laser interferometers are widely used in industry for the measurement of small displacements, refractive index changes and surface irregularities. They deliver the ultimate in high accuracy, and repeatable and traceable measurement. When built into inspection equipment, like a coordinate measuring machine (CMM), a laser interferometer system reports the surface condition of a product with more accuracy than any other method. Such a precision laser-position measurement system allows users to improve product quality and reliability, and increase manufacturing consistency and production yields.
In many manufacturing sectors, the standard method for checking tolerances on machined part surfaces, using laser interferometry, is to sample a small fraction of parts out of a production run, and measure them for accuracy. A manufacturer may be producing, for example, 100,000 common parts per year for an automotive or aerospace application, but only sampling approximately one out of every 500 parts for surface measurement inspection. This system of intermittent testing has proven itself over the years to be an acceptable method for verifying quality in machined parts.
But, as advancements in technology continually drive the need for higher accuracy, improved repeatability and better geometric (3D) performance in manufacturing processes, so, too, are more efficient and reliable quality verification processes being employed. For example, some models of fully-automated CMMs using laser interferometry, now in place with Tier One manufacturers, permit continuous in-line throughput of parts for automatic surface measurement. Instead of measuring one part out of every 500, these systems can measure every part for accuracy. And importantly, they can measure at a rapid rate of one part approximately every three seconds, compared to conventional CMM procedure using laser interferometry, which takes about five minutes to measure each part.
In manufacturing, CMMs are used to test a part or assembly against the design intent. By precisely recording the X, Y, and Z coordinates of the target, points are generated which can then be analyzed for the construction of features. These points are collected by using a probe that is positioned, in this circumstance via direct computer control (DCC). DCC CMMs can be programmed to repeatedly measure identical parts. Hence, CMMs are a specialized form of industrial robot.
VIBRATION ISOLATION IS CRITICAL
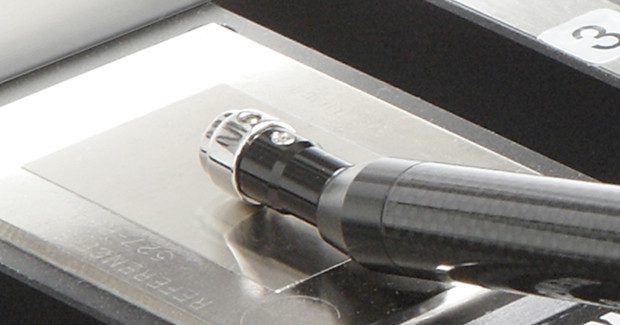
These high-throughput CMM laser interferometry surface measurement systems, however, can be negatively affected by plant low-frequency vibrations, which can distort the interferometry measurements and deliver inaccurate readings. One of these CMM systems, custom-designed and manufactured for specific applications by Arnold Gauge Company, Inc. (Fairfield, OH), has resolved the vibration issue. The company’s CMM system maintains its precision high throughput by integrating a unique, highly-compact Negative-Stiffness vibration isolation platform.
“Every second, the laser in the CMM is generating about 2,000 readings per second,” said Michael Bruins, the president of Arnold Gauge. “These readings, taken at the micron level, are displayed on a chart, plotted against the pre-engineered ideal surface. Due to these micro-tolerances, any vibrations whatsoever on the plant floor, such as from forklifts for example, are going to be detected in the readings and will negate the validity of the results. To counteract these vibrations, we selected Negative-Stiffness vibration isolation.”
Laser-based interferometers are extremely sensitive devices that are capable of resolving nanometer scale motions and features. They often have very long mechanical paths which makes them even more sensitive to vibrations. The sophisticated modern ellipsometry techniques that allow this high performance rely on low noise to be able to detect fringe movement. Properly isolating an interferometer will allow it to provide the highest possible resolution.
NEGATIVE-STIFFNESS VIBRATION ISOLATION
Because of their very high vibration isolation efficiencies, particularly in the low frequencies, Negative-Stiffness vibration isolation systems enable vibration-sensitive instruments, such as laser interferometers, to operate in harsh conditions and severe vibration environments that would not be practical with top-performance air tables and other vibration-mitigation technologies.
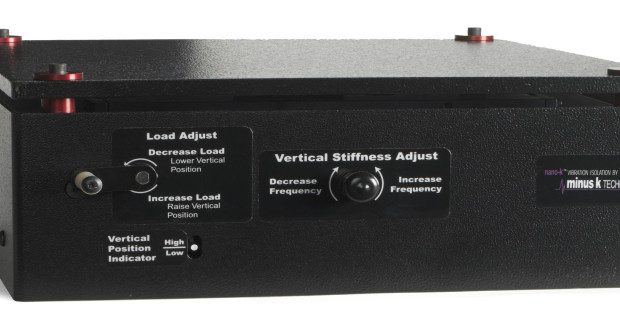
Negative-Stiffness isolators engineered by Minus K Technology, Inc. (Inglewood, CA), employ a unique and completely mechanical concept in low-frequency vibration isolation. They do not require electricity or compressed air. There are no motors, pumps or chambers, and no maintenance because there is nothing to wear out. They operate purely in a passive mechanical mode.
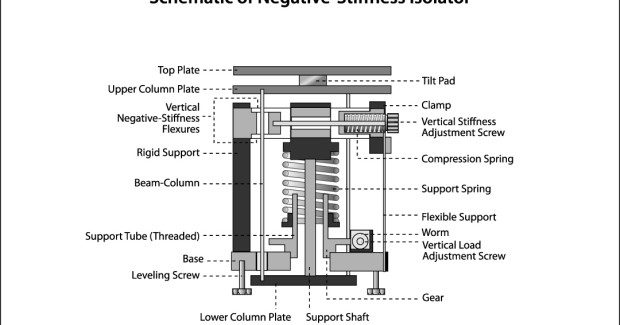
In this vibration isolation system, vertical-motion isolation is provided by a stiff spring that supports a weight load, combined with a negative-stiffness mechanism. The net vertical stiffness is made very low without affecting the static load-supporting capability of the spring. Beam-columns connected in series with the vertical-motion isolator provide horizontal-motion isolation. A beam-column behaves as a spring combined with a negative-stiffness mechanism. The result is a compact passive isolator capable of very low vertical and horizontal natural frequencies and very high internal structural frequencies.
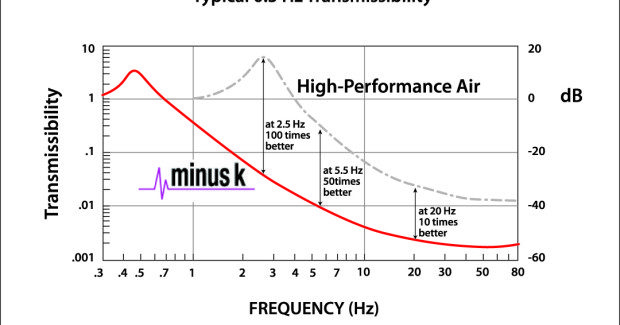
The isolator provides 0.5 Hz* isolation performance vertical, and 0.5 Hz horizontal, using a totally passive mechanical system – no air or electricity required. (*Note that for an isolation system with a 0.5 Hz natural frequency, isolation begins at about 0.7 Hz and improves with increase in the vibration frequency. The natural frequency is more commonly used to describe the system performance.)
Negative-stiffness isolators resonate at 0.5 Hz. At this frequency there is almost no energy present. It would be very unusual to find a significant vibration at 0.5 Hz. Vibrations with frequencies above 0.7 Hz (where negative-stiffness isolators begin isolating) are rapidly attenuated with increase in frequency. Also, transmissibility with Negative-Stiffness isolators is substantially improved over air systems. Transmissibility is a measure of the vibrations that are transmitted through the isolator relative to the input vibrations. The negative-stiffness isolators, when adjusted to 0.5 Hz, achieve 93 percent isolation efficiency at 2 Hz; 99 percent at 5 Hz; and 99.7 percent at 10 Hz.
“From a functionality perspective, we are getting fantastic repeatability and results,” added Bruins. The Negative-Stiffness vibration isolation has absolutely proved successful for our CMM applications using laser interferometry.”
About Arnold Gauge Company
In 1918, Henry Ford asked one of his quality engineers, Philip S. Arnold, to improve the quality of his automotive parts. In the basement of his home, Philip invented and began building in-process grinding gauges for Ford and other automotive companies. These gauges became so popular that he founded the Arnold Gauge Company in Flint, MI. Since 1973, the company has expanded its offerings to include precision measuring solutions ranging from small GO/NO gages to fully-automated systems capable of checking 25 features every 30 seconds, continuous 24/7. Since 2000, Arnold Gauge has provided custom gauging design for Tier One and Tier Two manufacturers. With a tradition of nearly 100 years and over 75,000 gauges produced, the company continues to provide the world’s finest in-process measurement solutions.
Arnold Gauge Company, Inc., 9823 Harwood Court, Fairfield, OH 45014, 877-942-4243, [email protected], www.arnoldgauge.com.
About Minus K Technology
Minus K® Technology was founded in 1993 to develop, manufacture and market state-of-the-art vibration isolation products based on the company’s patented negative-stiffness technology. Their products are used in a broad spectrum of applications including microscopy, nanotechnology, biological sciences, semiconductors, materials research, zero-g simulation of spacecraft, and high-end audio. This OEM supplies leading manufacturers of scanning probe microscopes, micro-hardness testers and other vibration-sensitive instruments and equipment, including private companies and more than 300 leading universities and government laboratories in 48 countries.
Dr. David L. Platus is the inventor of negative-stiffness isolators and is the president and founder of Minus K Technology. He earned a B.S. and a Ph.D. in Engineering from UCLA, and a diploma from the Oak Ridge School of (Nuclear) Reactor Technology. Prior to founding Minus K Technology, he worked in the nuclear, aerospace and defense industries conducting and directing analysis and design projects in structural-mechanical systems. He became an independent consultant in 1988. Dr. Platus holds over 20 patents related to shock and vibration isolation.
Minus K Technology, Inc., 460 Hindry Avenue, Unit C, Inglewood, CA 90301, 310-348-9656, Fax: 310-348-9638, [email protected], www.minusk.com.
The author of this article is Robyn Schmitt, a technical writer who specializes in instrumentation technology.


