Diamonds in the Rough
The demand for improved surface quality is increasing the need to effectively measure and analyze fundamental roughness and waviness parameters, contour and form error, and more. Here are some of the newest systems that efficiently meet this demand.
Posted: August 5, 2015
Ever higher levels of surface quality are being achieved in high precision optics and a wide range of other application areas, which places increased demands on non-contact and other measuring systems for improved resolution, speed, and measuring accuracy. Here are some of the newest surface measuring systems.
3D OPTICAL SURFACE MEASURING SYSTEMS
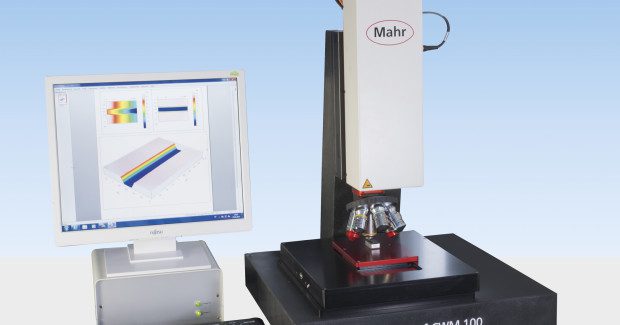
Mahr Federal Inc. (Providence, RI) has introduced two new optical surface measuring systems designed to provide fast non-contact 3D scanning and evaluation of very small to medium sized surface details on a wide range of components, including optics. The MarSurf® WM 100 uses a white light interferometer and the MarSurf CWM 100 includes both white light and confocal microscopy. These systems are designed for the measurement of optical, technical and reflecting surfaces, and to provide 3D topographical analysis where high information density is required, such as printed circuit boards.
The MarSurf CWM 100 and WM 100 provide highly accurate, non-contact measurement of surface structures with sub-nanometer resolution. Confocal microscopy is more adept at the measurement of dark surface structures, including the edges of small components, while white light interferometry is better suited to highly polished, shiny surfaces, including glass and optical surfaces. The white light scanning sensor in both units is designed for fast-paced 3D roughness measurement, using real time video scanning technology for excellent, high-resolution reproduction of even microscopic surface details. It comes standard with a 20X lens, with others available ranging from 2.5X to 100X, and provides resolution down to 0.1 nm. The confocal microscope available with the CWM 100 provides measurement of both 2D and 3D parameters to international standards along selectable surface lines or areal extracts. A 50X confocal lens is included, with others available. The CNC controlled object table and Z-axis provide 100 mm traversing range.
Measurement and evaluation are provided by easy-to-use Mountains for Mahr software, which allows surface views as profile section diagrams, topography, or 3D microscopy. Data can be imported and exported in differing formats, and the MarSurf aspheric option allows fast analysis of spherical and aspherical lenses.
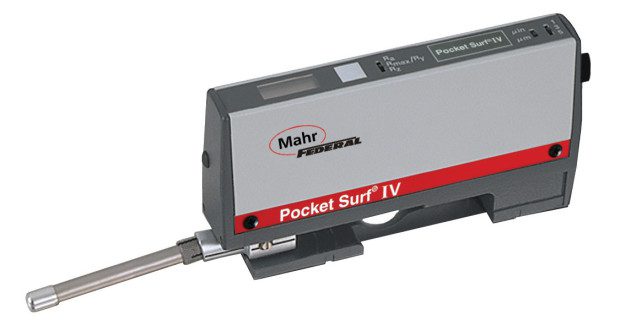
The company also introduces an updated version of its highly popular Pocket Surf® portable surface finish gage, which has enjoyed wide popularity for more than 30 years and across many precision applications because of its exceptional utility and simple one-button operation. The new Pocket Surf IV builds on that reputation with updated electronics and additional features to keep the product current for years to come. Like its predecessors, the Pocket Surf IV is simple to use and easy to read, displaying measurement results of Ra, Rz, or Rmax at a glance. However, a new feature of this gage allows for the display of each of these values with only one measurement stroke. Calibration of the new unit has also been made simpler with a single button calibration process that is fast, secure and does not require additional tools.
The Pocket Surf IV employs the unique MarConnect universal interface that allows USB, RS-232 or Digimatic output of data simply by choosing the right cable. When used with MarCom software, data can easily be transferred into Microsoft Excel or any Microsoft application. This new gage does not give up any of the original features found in the original Pocket Surf I, which revolutionized the portable surface gage market over 30 years ago. Long-valued features in these products include:
- Four switchable probe positions – axial (folded) or at 90 deg, 180 deg or 270 deg
- Easy access to difficult-to-reach surfaces such as inside and outside diameters
- Simple one-button operation to start the measuring stroke
- Easy-to-read LCD readout of the measured roughness value, in microinches or micrometers, within half a second after the surface is traversed
- Out-of-range (high or low) and “battery low” signals displayed
- Selectable traverse lengths of 1, 3 or 5 cut-offs of 0.8 mm/0.030 in
- Operates in any position – horizontal, vertical, and upside down
The Pocket Surf IV is still solidly built, with a durable cast aluminum housing to provide years of accurate reliable surface finish gaging. The new product is also compatible with all existing probes, stands and accessories. This gage comes in its own carrying case with riser plate, 9 volt battery and certified reference specimen. It is available in two configurations with either a 10 um or 5 um radius tip on the standard general-purpose probe provided.
Mahr Federal Inc., 1144 Eddy Street, Providence RI 02905, 401-784-3100, Fax: 401-784-3246, [email protected], www.mahr.com.
PRECISION ROUGHNESS, CONTOUR AND FINISH INSTRUMENTS
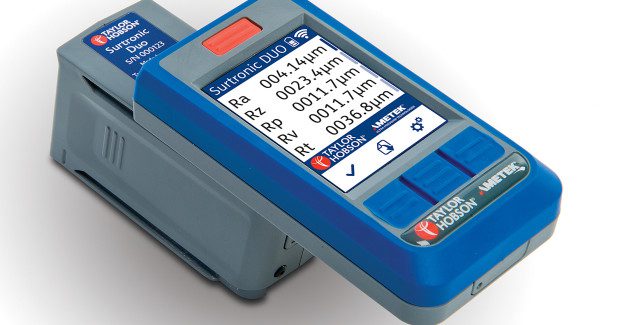
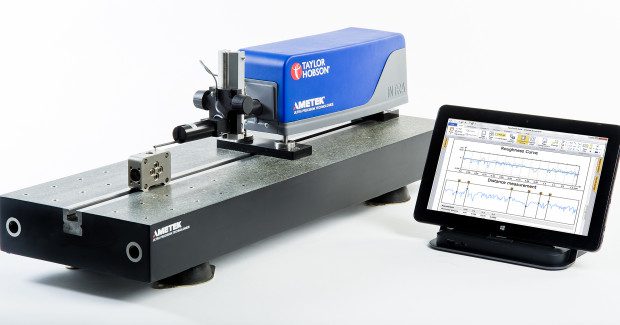
AMETEK Taylor Hobson Inc. (Chicago, IL) has broadened its comprehensive range of surface measurement testers with the addition of the Surtronic Duo portable surface roughness tester for shop floor and on-site measurement of multiple roughness parameters, and the Intra Touch contour and finish measurement system for precision machining and many other applications. Applications for these instruments include manufacturing process control in automotive, shipbuilding, pipelines, sheet steel, aerospace and other applications.
The Surtronic Duo uses a long-wearing diamond stylus that is drawn across a part with a precision motorized traverse mechanism. Vertical movement of the stylus is detected by a piezo-electric pickup that converts mechanical movement into electrical signals. The signals are digitized and sent to a microprocessor for instant calculation of surface parameters. Simple one-button operation produces a full set of traceable measurement results including a detailed profile graph. Display and traverse modules can be operated as one unit or separated for difficult access applications; Bluetooth connectivity allows wireless communication between them. The instrument is suitable for incoming and pre-shipment inspections, manufacturing process control and wear monitoring during product use.
Intra Touch provides all important surface finish capabilities, including fundamental roughness and waviness parameters, contour and form error analysis, feature exclusion, zoom tool and full programmability. Its simple user interface assures effective shop floor operation. The instrument’s 1mm vertical range and 16 nm resolution deliver high-accuracy contour and surface finish measurements. Its contour-only 28 mm gauge option is ideal for form measurement and its 50 mm horizontal traverse accommodates the majority of shop floor applications. With 0.5 um horizontal data spacing, small components and features can be measured more effectively than before. A manual column is available to provide a stable work station for large or tall components.
Tablet-based Talyprofile software allows uniform reporting of results from all of these surface measurement instruments.
AMETEK Taylor Hobson Inc., 1725 Western Drive, West Chicago, IL 60185, 630-621-3099, Fax: 630-231-1739, [email protected], www.ametek.com.
SURFACE AND ROUNDNESS MEASUREMENT SYSTEMS
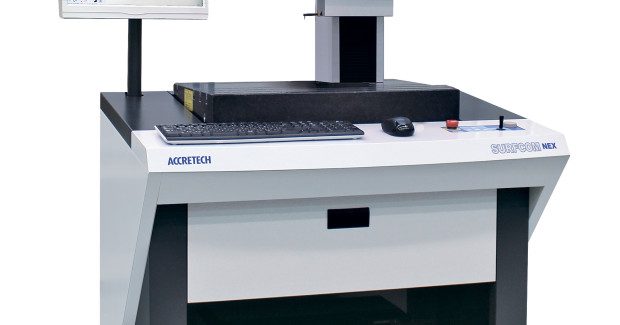
The NEX series of instruments from Carl Zeiss Industrial Metrology, LLC (Maple Grove, MN) integrate additional measurement analysis with their new detectors. SURFCOM NEX 100 offers a single hybrid detector to measure surface texture and contour at the same time. RONDCOM NEX Rs offers best-in-class spindle accuracy and allows optional surface roughness measurements in the horizontal, vertical and radial axes.
https://youtu.be/CsWr5WpFnZM
SURFCOM NEX 100 offers the highest accuracy in its class for roughness and contour measurements, and the analysis of both in one measuring run enhances measuring efficiency. Choose from multiple contour and roughness sensors to fit your application. The high-speed and low-vibration linear drive unit delivers long-term stable movement, for the highest measurement accuracy. This patented dual detector offers single data gathering at nano-level measurement resolution for roughness and contour profiling. The hybrid detector is also available for those interested in upgrading their existing linear surface systems. SURFCOM NEX uses dedicated detectors with expanded contour range (60 mm) and highest fidelity (0.1 nm resolution min) for surface roughness. New features include a 30 percent larger standard granite table over existing machines, expanded to 133 mm with T-slots for ease of part staging. Additional benefits include an improved detector safety mechanism, quick change magnetic contour arms that do not require requalification, optional T-stylus probing for up/downward tracing, automatic stylus force (NEX 040) and a temperature correction function for assured accuracy within 20 deg C ±5 deg.
RONDCOM NEX Rs offers best-in-class spindle accuracy and allows optional surface roughness measurements in the horizontal, vertical and radial axes. The offset detector holder allows various workpieces to be measured easily without interference from the R-axis arm. Measuring can be switched between outside diameter and top flatness simply by tilting the detector holder. RONDCOM NEX series offers a larger table top (235 mm) available with manual or auto tilt centering for fast and accurate part setup with rotation up to 20 rpm. New features include a full cover base and column to reduce environmental influences during the measurement cycle. Maximum performance is possible with the improved accuracy, low noise and vibration air spindle design, combined with a stainless steel table and expanded centering range (±5 mm). The Z-axis column incorporates a linear scale for more precision positioning. Automatic column guideway lubrication assures years of maintenance-free operation. The light-weight, ceramic R-axis with greater stiffness and a linear scale optimizes radial linear measurements for Z-axis straightness on tapered surfaces, spiral cylindricity and opposing diameter measurements.
There is also an option to measure periodic and fine twist structures of cylindrical shafts. This “lead twist” software extension evaluates by visualization and quantifying the twist surface structure created by the grinding feed process. Detector positioning for ID/OD measurements, top/under/ tapered surfaces measurements, and so on can be controlled automatically. The same detector can also be used with all standard type roundness instruments from Zeiss and is also available with upgrades, which reduces maintenance costs by having the same sensor. The RONDOM NEX system is an excellent solution for all geometric form analysis requirements that may be requested by the demands of quality assurance.
Both of these systems are powered by the ACCTee PRO suite of surface and form measuring application software. Based on the “All in the Document!” file creation format, one file structure handles the measurement and analysis conditions, data point sets, CNC part programming and reporting. ACCTee PRO is Windows 7-based and provides the operator with an intuitive user interface to complete their inspection plans in the most logical and concise method.
Carl Zeiss Industrial Metrology, LLC, 6250 Sycamore Lane North, Maple Grove, MN 55369, 763-744-2400, Fax: 763-533-0219, [email protected], www.zeiss.com.


