Simple, Visible Inspection
Take a look at some of the latest advances in quality assurance software to help your shop remain competitive.
Posted: June 5, 2015
Quality assurance software continues to evolve, with continuing automation of inspection and testing processes, mobile and cloud applications, application customization by process, and greater integration with overall business metrics. Here’s a look at some of the latest advances in quality assurance software to help shops remain competitive.
MORE VISIBLE DATA SIMPLIFIES REPORTING
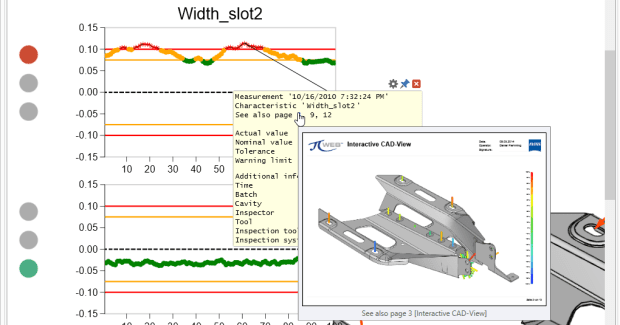
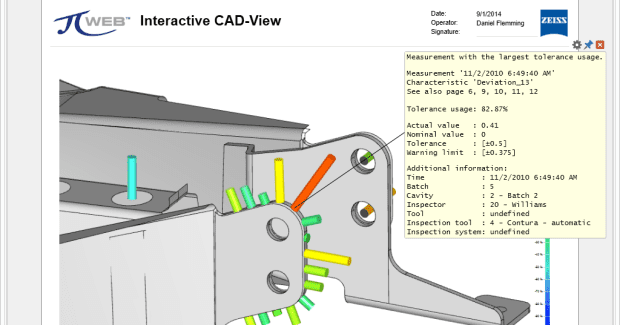
Tailored for small and medium-sized businesses, the extended version of PiWeb sbs quality data management software from Carl Zeiss Industrial Metrology, LLC (Maple Grove, MN) makes it possible to connect all gaging and inspection devices into one common reporting system, allowing customers to standardize reporting requirements across a wide range of metrology inspection devices and personalize reports. Enhanced graphical representation of measured parts makes it easier and faster to communicate part quality.
https://youtu.be/oke8mT1jp-k
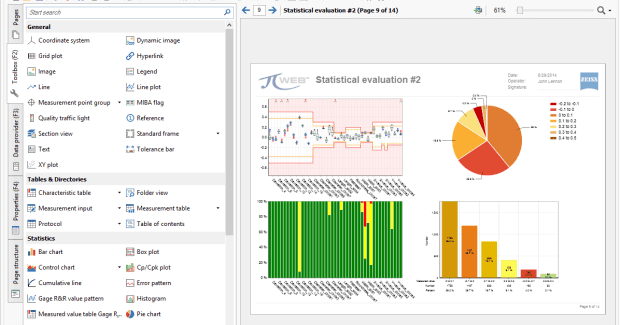
PiWeb sbs reduces administrative labor costs by automating and simplifying the creation of many time-consuming quality documents and inspection process control forms. It combines and reports inspection data from one or multiple measuring devices into graphical part stories, SPC charts and quality documents. Users can also create graphical interfaces to assist inspectors in collecting data from manual gages or visual inspection parameters. Engineering, production and quality managers have remote and independent access to view reports.
Statistical functions inherited by PiWeb sbs may be added to reports to enhance part stories, create SPC tables or use for live monitoring and process control. This enhanced reporting capability provides clearer, more accessible and personalized reports. The software has been engineered to dramatically simplify the way in which a shop presents and analyzes measured data for performance, flexibility and ease of use.
Carl Zeiss Industrial Metrology, LLC, 6250 Sycamore Lane North, Maple Grove, MN 55369, 763-744-2400, Fax: 763-533-0219, [email protected], www.zeiss.com.
SHARPLY REDUCE CMM PROGRAMMING TIME
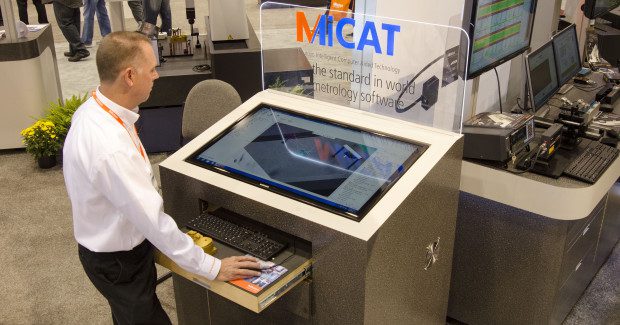
Mitutoyo America Corporation (Aurora, IL), a leader in the field of precision measuring tools and instruments, introduces the MiCAT Planner automatic measurement program generation software that uses 3D CAD models and Product and Manufacturing Information (PMI) to enable one-click automated generation of measurement programs. With this new program, a complex program that previously would have taken five hours to complete manually can now be completed in 15 minutes.
Aerospace, defense and medical device manufacturers will realize significant savings in time and money by making the automatic measurement program generation software MiCAT Planner a part of their digital product definition strategy. “MiCAT Planner software is changing the relationship between people and precision measurement with one click,” said Larry Maggiano, a senior systems analyst at Mitutoyo America. “Our software program reduces programming time by up to 95 percent, compared with programming using general‐purpose software, for a significant potential increase in the efficiency of measurement processes.”
MiCAT Planner bypasses the old drawing-based method to directly generate and execute a model-based workflow. “The coordinate measuring machine (CMM) is configurable virtually,” explains Maggiano. “A model-based definition (MBD) is imported, a set of rules is applied and matched to the configured CMM, and a measurement plan is generated. With one mouse click, a final probe path optimization is performed to reduce the number of probe changes and to minimize CMM movement to the lowest possible cycle time, and that part program is then automatically generated.”
Benefits of MiCAT Planner include:
- Streamlined processes.
- Improved productivity.
- Reduced manufacturing costs.
- Enhanced traceability.
- Shops can realize up to a 95 percent savings in time compared to drawing-based methods.
- Component manufacturers receive a single CAD file and complete all the necessary steps to build and inspect a part.
- All pertinent features and characteristics are transferred into the inspection software, reducing the risk of misinterpretation.
- Discrepancies arising from differences between the drawing and the CAD model are eliminated.
- CMM configurations can be changed at any point.
- Workflow automation.
- Part measurement consistency.
Established in 1963, Mitutoyo America offers turnkey metrology solutions and integrates measuring directly into manufacturing processes via inline automation. The company is the first service organization to have A2LA-accredited field service technicians. To help develop metrology solutions that best suit customer needs, Mitutoyo America operates nine M3 Solution Centers across the country, staffed with dedicated metrology specialists providing expertise on the most advanced technological equipment.
Mitutoyo America Corporation, 965 Corporate Boulevard, Aurora, IL 60502, 630-820-9666, Fax: 630-820-2614, www.mitutoyo.com.
MULTI-FUNCTION TOOLBOX
Zontec, Inc. (Cincinnati, OH), an international developer of statistical process control (SPC) software solutions, announced an update to its Synergy 2000™ Multi-function Toolbox, an easy to use utility program that automates data transfer in both Synergy 1000 and Synergy 2000 programs. The chief upgrade included in Version 3.0 is the Keyence Interface Module that allows for automatic creation of Data Bank and associated Data Tables based upon measurement programs configured in the Keyence IM Series image dimension measurement system. The module also streamlines automated transfer of data with accompanying information through an output .csv file that is configured in the Keyence software and allows scheduling continuous data transfer at defined time intervals.
“The time savings we realize will allow more measurements per shift (or) day, better visual review of product, and eliminate manual data entry errors once implemented,” said Brian Kropp, the quality control manager at Fastco Industries, Inc. (Grand Rapids, MI). “When implemented it will drastically decrease manual input for variable data recording.”
As always, the Multi-function Toolbox automatically collects the data in real-time and enables companies to seamlessly transfer legacy data from other applications or databases, integrate data from manufacturing applications such as enterprise resource planning (ERP), laboratory management systems (LIMS), supervisory control and data acquisition (SCADA) systems as well as serve as a communication bridge between (Open Platform Connectivity) OPC servers and the Synergy 2000 OPC client. “The transparency and convenience of data automation for the market continues to be critical,” said Zontec president Warren Ha. “A guiding principle in our ongoing development and flexible design is to ensure our clients unique needs are met with an adaptable solution.”
Other new features included in this release allow for improved and more versatile file formatting, handling, and organizing as well as wireless gaging interface enhancements that allow remote collection of data. The new version is available for a one-time cost.
Zontec, Inc., 1389 Kemper Meadow Drive, Cincinnati, OH 45240, 513-648-9695 ext. 204, [email protected], www.zontec-spc.com.
REMOTE COLLABORATION IMPROVES NDT INSPECTIONS
The Measurement & Control unit of GE Oil & Gas (Billerica, MA), a leading innovator in advanced software and services, sensor-based measurement, non-destructive testing and inspection, flow and process control, turbine, generator and plant controls, and condition monitoring, has released InspectionWorks Connect, a remote collaboration software platform for the nondestructive testing (NDT) and inspection industry that provides real-time access to live inspection video and data from anywhere in the world, which enables smarter, faster decision-making, improves inspector productivity and reduces training costs.
The NDT and inspection industry is undergoing a major shift toward digitization. Experienced inspectors and technicians are retiring and there is a shortage in qualified replacements. Technological advancements such as InspectionWorks Connect allow organizations to operate with greater inspection productivity, conduct more accurate, consistent inspections and shorten the learning curve for new inspectors. “The NDT and inspection industry relies on accurate, real-time information to be effective,” said Kermit Hoffman, the general manager of inspection technologies at GE Measurement & Control. “Tools such as this allow inspectors to harness the power of the industrial Internet and make smarter decisions faster.”
Real-time collaboration during asset inspections can deliver many asset reliability, process safety management (PSM) and productivity benefits for asset owners, including:
- Improved probability of detection and reduced false indications by allowing an expert second opinion on critical inspections.
- Improved inspection productivity and faster startups during large, complex inspection jobs like maintenance turnarounds.
- Quicker response and reduced travel costs for urgent inspections by allowing experts to participate remotely, rather than scrambling to an inspection site.
- Faster and less expensive training for new technicians by giving them real-time access to expert support and a second opinion.
- Improved safety and risk management outcomes by limiting inspector exposure to confined spaces, high temperatures, nuclear or security-critical inspection environments.
InspectionWorks Connect is a secure, encrypted solution that is embedded on NDT devices without the use of any additional equipment. It is also zero-install, which means that users only need a web browser to log in remotely. InspectionWorks Connect provides:
- Live video streaming of inspections.
- Collaboration tools, including 2-way chat communication and telestration.
- Cloud-based infrastructure.
- Wireless connectivity .
- Over-the-air software updates.
Across the aerospace, power generation, offshore oil & gas, petrochemical, refining and nuclear industries, as well as general manufacturing, InspectionWorks Connect offers a new way of improving inspection outcomes. It is currently available for use with visual inspections on the GE XLG3 and GE Mentor Visual iQ Videoprobes, as well as the Mentor EM eddy current portable.
GE Oil & Gas, 1100 Technology Drive, Billerica, MA 01821-4111, 978-437-1000, www.gemeasurement.com.
MONITIZE MANUFACTURING METRICS
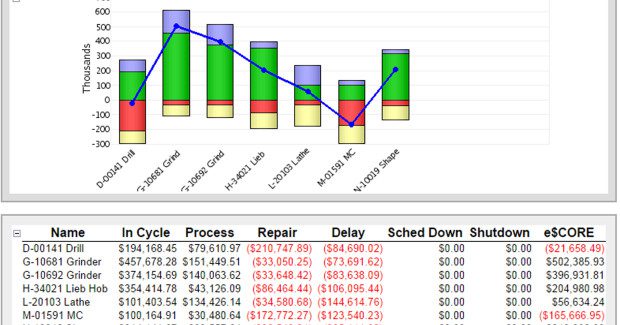
A new e$CORE software feature from 5ME (Cincinnati, OH) generates a monetized version of machine tool performance based on the six span-time categories as defined by the Association for Manufacturing Technology (AMT; McLean, VA). Part of the Freedom eLOG software suite, e$CORE provides full transparency into manufacturing gains or losses in terms of dollars, putting the amount of money being saved or wasted in the manufacturing plant at management’s fingertips. The software includes three types of reports – Burden, Monetary and Summary – which can be customized by users based on an assigned hourly value for each machine. Users assign percentage “weights” based on the AMT category (plant shut-down, scheduled downtime, delay time, repair time, not in-cycle process time and in-cycle time), and the e$CORE value is calculated by summing the daily values in each category.
“Our software provides real-time monitoring and analysis, machine diagnostics, and a comprehensive array of manufacturing metrics,” said Pete Tecos, the executive vice president marketing and product strategy for 5ME. “e$CORE adds a key performance indicator (KPI) that translates directly to profitability.”
The three report types can be viewed in monthly, weekly, daily or hourly timeframes. The Burden report compares the performance of selected machines, and presents a net value in a stacked bar graph with colors that correspond to the AMT categories. Each bar shows how that category contributed to the cumulative e$CORE value. The Monetary report shows Production Values (in-cycle and not in-cycle process time) vs. Lost Production Values (plant shut-down, scheduled downtime, delay time, repair time). The Summary report shows the values reflected in the Monetary report, but includes the aggregate values for each machine. This allows for machine-to-machine comparisons for the selected timeframe.
The Freedom eLOG software suite automatically extracts critical manufacturing data to produce web-based reports and analytics on asset utilization, availability, performance, quality and OEE. It is brand, asset and process agnostic, as well as MTConnect-compliant. The software integrates seamlessly with ERP, MES, maintenance and quality business systems and can be accessed anytime via smartphone or tablet device. 5ME provides asset monitoring and manufacturing efficiency software, cryogenic machining systems for any brand machine tool, application engineering as well as tooling and coolant solutions.
5ME, 4270 Ivy Pointe Boulevard, Suite 100, Cincinnati, OH 45245, 586-202-3285, [email protected], www.5me.com.


