Measuring Surface Finish
Here are some of the latest advances in surface measurement work that show the newest capabilities and innovations in metrology for the shop floor.
Posted: April 30, 2014
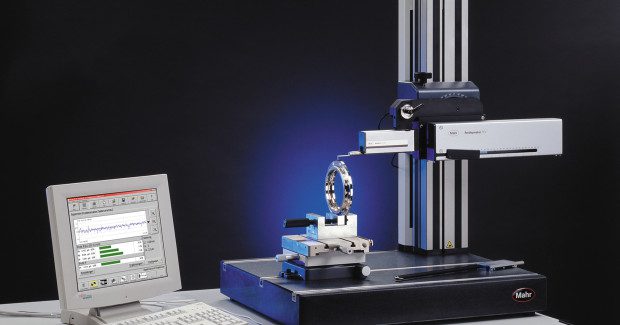
“But the key development objective of MarWin 5.0 was to enhance usability,” notes Nugent. “The package includes a large collection of Assistants and other functions which really speed profile set-up and operation, and make the process of using the software much more flexible and efficient.” Improved general functions include automatic user log-on, zero setting of the probe using the Hz axis of the measuring stand, automatic zenith search, and automatic centering of the probe inside bores.
A new Elements function allows you to make various elements used in profile construction either visible or not visible. This can dramatically clarify the screen view when creating or modifying a complex contour evaluation, for example. Also, all hidden items can be made visible again with a single click, saving a great deal of editing time.
A function called, “Contact line with defined angle,” ensures there is only a single point of contact in edge detection, for example, or that reference lines are on the highest or lowest point. Defined angles can also be of help in searching for points of intersection with a fixed reference contact. A Profile fit-in function allows the user to overlay a target profile with tolerance bands onto a measured profile. This can be very useful in wear measurements, or for the optical representation of tolerances, either scaled or non-scaled.
MarWin 5.0 is much more configurable than earlier versions. Mahr has made the integration of scripted or customized programs much easier, and has a large library of special modules available that can easily be integrated into MarWin 5.0. Scripts can be activated before measurement; after measurement but before analysis; or after analysis, when data can be especially configured to specific export criteria. Examples of scripted programs can include the addition of special filters, the calculation of special parameters, or the custom development of totally new measurement applications.
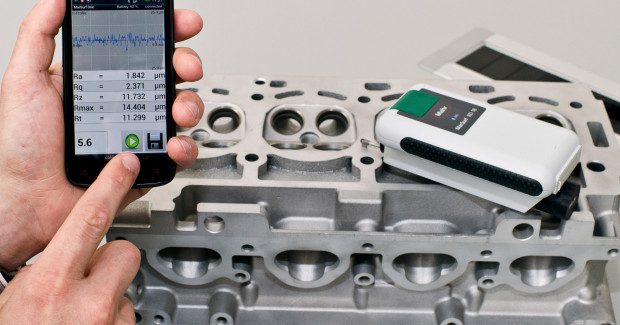
Finally, Mahr has bridged the gap between portable surface measuring devices and larger, full-featured, PC-based surface measurement and evaluation systems with the MarSurf® XR 1 surface measuring system. The MarSurf XR 1 combines the skidded and skidless drive units of Mahr’s portable M-Series instruments, with its industry-leading MarWin evaluation software. The new XR 1 provides an affordable entry into the world of modern, PC-based measurement and evaluation systems, including compliance with all International Standards, diverse evaluation methods, extensive documentation, large storage capacity, data export and import, as well as networking and other benefits.
“The gap between portable units and higher end surface evaluation systems used to be quite large,” stated Nugent. “The XR 1 sits squarely in that gap, offering users the benefits of both portability and fuller-featured evaluation in skidded and skidless measurements.”
The XR 1 is suitable for use either in the measurement lab or on the shop floor, and provides over 80 parameters for R, P, W profiles according to current DIN, ISO, JIS, ASME and MOTIF Standards. The system can utilize both the MarSurf RD 18 drive unit with skidded probe and the MarSurf SD 26 drive unit with skidless probe, and virtually any number of drive units can be connected to the evaluation unit via Bluetooth or cable. Measuring units can be used alone in different orientations, in combination with various accessories, or mounted on measuring stands. Measurements can be initiated either by touch screen on a PC or manually on the drive units.
The MarSurf XR 1 comes standard with a basic version of MarWin surface evaluation software, which includes Measuring Station View; automatic user login; R, Rk, P, W, Motif, and D-profile and parameters; Export ASCII; Profile Assistant for USB; and Measuring Assistant Level 1 for simple setup of measurement conditions.
However, all the additional features of the XR 20 evaluation software are also available as option packages, including an Advanced Evaluation package with interactive zoom; virtual rulers and PDF file export; a Multi-Measure option package which expands the Measuring Assistant to Levels 2 and 3, as well as providing additional statistics and administration functions; an Advanced Reporting option with PageDesigner to create template forms and provide tolerance monitoring and display; a Script Program Integration option; Digital I/O, QS-STAT, and Profile Processing Options; and many more.
With the RD 18 skidded probe on the XR 1, cut-off lengths between 0.08 mm (.003 in) and 2.5 mm (.100 in) can be selected by the user or automatically determined based on the actual surface profile being measured. The ergonomically designed drive unit can take measurements in any position, and the prismatic shaped bottom can even act as a V-block for positioning small parts. Threaded sockets in the undercarriage allow the attachment of accessories, and rechargeable batteries provide capacity for approximately 1,000 measurements before recharging.
Benefits of the MarSurf SD 26 Skidless drive unit on the XR 1 include a proprietary motorized probe height adjustment feature that quickly and automatically zeros the probe in seconds and can cut measurement time in half, and a magnetic, breakaway probe mounting system which protects sensitive probes from accidental damage and facilitates fast probe changes. The MarSurf XR 1 is available with a wide range of probes, options, and accessories to allow the most flexible configuration for your applications.
Mahr Federal Inc., 1144 Eddy Street, Providence RI 02905, 401-784-3100, Fax: 401-784-3246, [email protected], www.mahr.com.
SURFACE FINISH MEASUREMENT FOR CMMS
The SFP1 probe option for the REVO® five-axis measurement system from Renishaw Inc. (Hoffman Estates, IL) is the first to allow surface finish inspection to be fully integrated within coordinate measurement routines. With a measurement capability of 6.3 Ra to 0.05 Ra, the SFP1 surface finish probe makes the CMM a “single platform” metrology system. It eliminates the need for hand-held surface measurement devices or transporting parts to a dedicated surface measuring machine, reducing labor costs and inspection lead times. The system allows automated switching between dimensional measurement and surface finish measurement, with the analysis contained in a single report.
An overview and demonstration of the REVO® five-axis measurement system.
The probe incorporates a C axis that, combined with the infinite positioning of the REVO head and choice of stylus holders, allows the probe tip to be automatically oriented to any angle to suit the part, ensuring that the highest quality surface data is acquired. This enables flexible access to component features, combined with the consistency of fully automated CNC control. Using the straight stylus, the SFP1 can perform a measurement trace within a 10 mm diameter bore to a depth of 100 mm.
A skidded probe with a 2 µm (0.000079 in) radius diamond stylus tip, the SFP1 probe outputs Ra, RMS and raw data formats to the metrology application software via UCCServer software, using the I++ DME protocol. The raw data can subsequently be presented to specialized surface analysis software for more detailed reporting. Calibration of the probe is also automated under the CMM program. A surface finish calibration artifact (SFA) is mounted on the MRS rack and is measured using the SFP1 probe. Software then adjusts parameters within the probe in accordance with the artifact’s calibrated value.
Renishaw, Inc., 5277 Trillium Boulevard, Hoffman Estates, IL 60192, 847-286-9953, Fax: 847-286-9974, www.renishaw.com/probes.


