Measuring Surface Finish
Here are some of the latest advances in surface measurement work that show the newest capabilities and innovations in metrology for the shop floor.
Posted: April 30, 2014
As dimensional tolerances grow steadily tighter and the need for documentation and traceability ever greater, the role of surface roughness/finish measurement in manufacturing is growing dramatically. Because the proportion of the tolerance band taken up by surface irregularities is now frequently 50 percent or more, measuring engineered surfaces has become critical as the capability for creating parts with tight tolerances is moving toward the creation of mirror-like surfaces. The following list of instruments show some of the latest advances is surface measurement work.
COMBINED ROUGHNESS AND SURFACE MEASUREMENTS
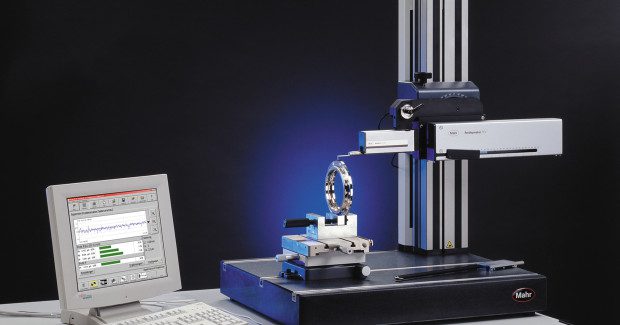
Building on the success of its industry-leading MarSurf® LD 120 system for combined surface and contour measurements, Mahr Federal Inc. (Providence, RI) offers the next generation of instruments with a number of improvements and innovations. Together the LD 130 and 260 feature longer travel — the longest in the industry for the LD 260 — the fastest positioning and measuring speeds in the industry, an innovative biomimetic probe arm design with magnetic mounting and automatic probe recognition, dynamic measuring force, extremely low residual noise, and a plethora of other improvements.
“Simply put,” said Pat Nugent, Mahr Federal’s vice president of metrology systems, “our intent with the design of the LD 130 and 260 was to take the success of the MarSurf LD 120 platform and improve on it in any way we could. One interesting example is the probe arm designs, which are biomimetic, meaning their shapes mimic those found in nature. By using these shapes we’ve been able to reduce probe weight by as much as 50 percent while maintaining the same rigidity, and thereby dramatically improving dynamic response.”
The LD 130 and 260 units feature travel lengths of 130 mm and 260 mm, respectively. This not only allows measurement of much larger parts, but with travel speeds up to 200 mm/sec and measuring speeds up to 10 mm/sec (depending on the surface) measuring cycle times can be significantly reduced – as much as 50 percent in the case of a 260 mm steering shaft with gear tooth measurements at each end.
A demonstration of the MarSurf LD 130 system.
Improved dynamic response of the probe also helps increase measurement speeds and reduce measurement cycle time by allowing the probe to better track the part surface. In addition, dynamic measurement force allows the drive units to operate at angles of ±45 deg from horizontal, dramatically increasing the flexibility of the LD 130 and 260 systems.
Both units have been redesigned to improve both safety and accessibility. The tip of the newly designed biomimetic probes is now below the lowest point on the housing, allowing improved access in more measuring applications. In addition, while the LD 130 and 260 retain the magnetic breakaway probe feature of the early LD 120 system, the entire lower housings on the new units are pressure sensitive so that in the event of unintended contact with another object an emergency signal is initiated and stops all movement of the drive unit.
Automatic probe recognition has also been improved. While RFID signals used on competing systems can cause confusion if two or more probes are in signal range, Mahr’s automatic recognition system is measuring program specific and requires operator confirmation. Thus, the proximity of other probes is not an issue, and should another probe be mounted while an operator is on break, for example, he will be notified before resuming his measurement program.
Finally, the residual noise signal in the LD 130 and LD 260 units has been significantly reduced. This is the roughness “error” that would still be recorded if the probe traced a perfectly flat surface. In the MarSurf LD 120, this was specified at between 34 and 40 nm Rz. In the new units, this has been reduced by nearly 50 percent, to 20 nm Rz, a significant improvement for those making ultra-high precision surface and contour measurements. The LD 130 and 260 systems for combined surface and contour measurement are available in a number of different configurations and with a wide range of probe design tips and other accessories.
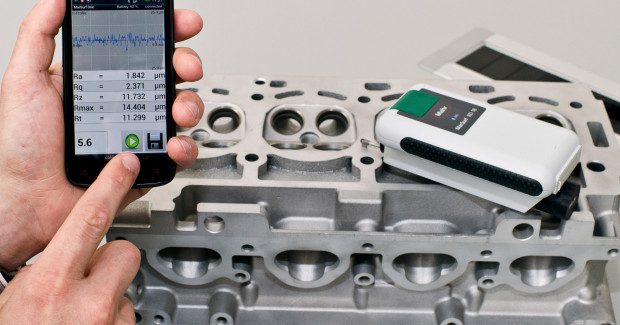
The company also offers a revolutionary way to measure surfaces by using an Android App that lets users measure common surface roughness parameters with their Smartphones and other Android operating system devices. The MarSurf® One App interfaces via Bluetooth with a Mahr RD 18 Drive Unit and probe to measure the most popular roughness parameters, including Ra, Rz, Rmax, Rt, and Rq. Resulting profiles can be zoomed using multi-finger gestures for instant analysis, saved, converted to PDF files, synched or emailed for display and analysis on other devices such as PCs.
“Using the MarSurf One App with your Smartphone is a very inexpensive, and extremely portable, way to obtain surface roughness measuring capability,” added Nugent. “The MarSurf One App requires an RD 18 Drive Unit and probe, of course, which come standard with MarSurf M 300 systems. However, by purchasing the RD 18 as a separate unit and using it with the MarSurf One App, the result is a total system that is less expensive than buying an M 300 system.”
The MarSurf One App can be downloaded from Google Play for Android. A free demo version is available for 7 days, and the full, licensed version can be purchased via the “buy button” for automatic download. No operator training is required as operational elements follow typical and well-known Android user interface styles. The MarSurf One App uses a standard R-profile filter and measures in accordance with DIN EN ISO 16610-21 (digital phase correct).
To make the process of surface evaluation better, easier and faster, Mahr released an upgrade to its surface metrology software, MarWin® Version 5.0. The upgrade includes a patented new Tangential Elements function for evaluating transitional geometries such as radii, relief grooves, and chamfers; new ISO 16610 filters; and a host of new Assistants and Script integration functions that speed and facilitate the measurement and evaluation process.
“Tangential Elements is an entirely new function for contour evaluation software,” explains Nugent. “For the first time, users have a tool to evaluate those tricky transitional contour geometries like corner radii, chamfers and relief grooves. MarWin 5.0’s patented process eliminates guessing by using tangential circles and lines to determine actual points of contact and best fit forms to provide uninterrupted line shape analysis between geometric elements.”
New ISO 16610 Gaussian filters are also included in the MarWin 5.0 upgrade package, with ISO 16610-21 re-placing ISO 11562, and ISO 16610-31 replacing VDA 2008. However, operators still have the option of using the old filters if required by their applications.


