Deformation-Free Clamping: From the Plastic Chuck Jaw to the Hybrid Chuck
When highly deformable workpieces need processing, conventional 3-jaw chucks quickly reach their limits. This primer from Schunk identifies different clamping tools and devices for deformation-free workpiece clamping and the criteria they should meet to demand efficiency and precision.
Posted: September 5, 2012
When highly deformable workpieces need processing, conventional 3-jaw chucks quickly reach their limits. If the clamping forces are too low, there is no secure hold. If they are increased, workpieces deform and precision is reduced.
A great variety of clamping tools and devices for deformation-free workpiece clamping ranges from comparatively low-priced plastic chuck jaws and pendulum jaws to special jaws and oscillating compensation multi-jaw chucks, up to self-centering magnetic chucks. Users who are looking for the best solution should first define the importance of each individual application: Which components are to be machined in which lot size? Are the workpieces manually or automatically loaded? How flexibly can the machine be used? Which form and positional tolerances have to be met? Based upon these criteria, an optimum solution can be worked out that will demand efficiency and precision.
PLASTIC JAWS: THE LOW-PRICED ALTERNATIVE
Special jaws made of glass fiber-reinforced plastic are still considered to be an insider’s tip in the field of workpiece clamping with low deformation. Their high friction coefficient of 0.3 to 0.4 and a wrap angle ensure that high machining forces are transmitted, even in case of low clamping forces.
The structure of the aluminum support jaw provides stability. Due to the low weight of the clamping solution made of an aluminum support jaw and plastic top jaw, low centrifugal forces occur at the jaws during the turning operation. Therefore the plastic jaws are also suitable for high machining speeds of up to 6,000 rpm and, when used on ground or surface-treated components, no clamping marks will occur. The pricing is attractive as well because the clamping inserts are exchangeable.
PENDULUM JAWS: EFFICIENT AND LOW-PRICED
While the high friction coefficient of plastic jaws is used for clamping workpieces with low deformation, the number of clamping points is important for pendulum jaws. The basic version of the pendulum jaws is equipped with two clamping inserts, which doubles the clamping points of a 3-jaw chuck. They are available for ID and OD clamping and are mounted like top jaws onto the base jaws of the 3-jaw chuck. The contact points are evenly distributed over the OD or ID at a 60 deg angle. As a result, pendulum jaws can be used for a conventional 3-point clamping application and then transform to an optimally compensating 6-point clamping application.
What is the effect of 6-point clamping? At an identical clamping force and a twofold increase of the clamping points, the achievable mathematical true-running accuracy is increasing by a factor of 17. For example, if a tube section of 50 mm length, made of aluminum, with an OD of 60 mm and an ID of 50 mm is clamped with 100 kN in a conventional 3-jaw chuck, the mathematical deformation amounts to 0.497 mm. Clamping over 6-point pendulums improve the value to 0.029 mm. Due to the pendulum motion, the chuck jaws optimally adjust to the workpiece and compensate the form tolerances within a certain range, such as in the case of cast iron bodies.
With the help of calculation programs, the necessary pendulum motion can be determined in order to meet the predefined true-running tolerances. For example, the mathematical deformation of the workpiece from the above-mentioned example amounts to 0.002 mm with a 12-point-pendulum. It should be stressed at this point that this is a calculated value, not an exact value.
In the case of conical components, it may be necessary to use a 24-point pendulum solution in order to achieve the required precision. The workpiece will be radially clamped on two levels with 12 clamping points that are rotation-mounted. In turn, both clamping levels are arranged in an oscillating manner so that all of the clamping points lie flat at the workpiece and form errors of the component can be compensated.
6-JAW CHUCKS: HIGH-PRECISION AND FLEXIBLE
Even if pendulum jaws lead to the desired result, they can still reach their limits if high repeat accuracies and precision at the workpiece are needed. In this case, manufacturers should use a 6-jaw chuck (such as a ROTA NCR) since it is rotation-mounted and compensating. For finish machining or clamping of pre-turned surfaces, the pendulum should be clampable in its center position, so that all six jaws can move concentrically.
A ROTA NCR chuck consists of a central chuck piston, which supports three inner pendulums which are evenly arranged at a 120 deg angle. Each pendulum jaw is connected with two base jaws. The result is a workpiece that centers between six contact points, which are in turn pairwise centered. Since the clamping forces are aligned with the chuck center, even raw parts are optimally centered without being aligned with the workpiece. With its oscillating jaws, the chuck perfectly adjusts to the raw part.
For conventional jaw clamping, this configuration allows maximum roundness and optimum centering of the workpiece. Instead of pricey specialized solutions, conventional standard jaws can be used on the jaw interface. Moreover, the top jaws are considerably lighter than pendulum jaws and the influences of the centrifugal forces are minimized. In contrast to applications with face plates, the complete clamping operation of a ROTA NCR runs quickly and precisely. Due to the high precision, some costly manufacturing steps can be eliminated, such as grinding operations during the finishing work, because the tolerances have already been achieved.
MAGNETIC CHUCKS WITH RADIAL POLE TECHNOLOGY: THERE IS NO DEFORMATION
Chucks with electrically-activated permanent magnets work even more efficiently. Their variable pole extensions ensure safe and deformation-free workpiece clamping. Without any additional set-up effort, workpieces of various sizes can be alternately and precisely machined on the magnetic chucks. Due to a multi-stage adjustment of the holding force, the parts can be easily aligned with the chuck and are quickly clamped without deformation.
Magnetic chucks allow 3-sided turning operations in one set-up, or milling operations from five sides. Comparative measurements of users on-site have shown that set-up times can be cut by 30 percent to 50 percent by using magnetic clamping technology. When machine downtimes decrease and workpiece machining becomes more efficient, a magnetic clamping solution proves to be a wise investment.
Moreover, surface clamping minimizes vibrations and prevents the tool’s cutting edge from wear. In the case of high-quality tools, the magnetic clamping technology reduces the tool costs and improves the surface quality as well. Depending upon the application, magnetic chucks with automatic demagnetization, or with particularly high magnetic forces, should be used.
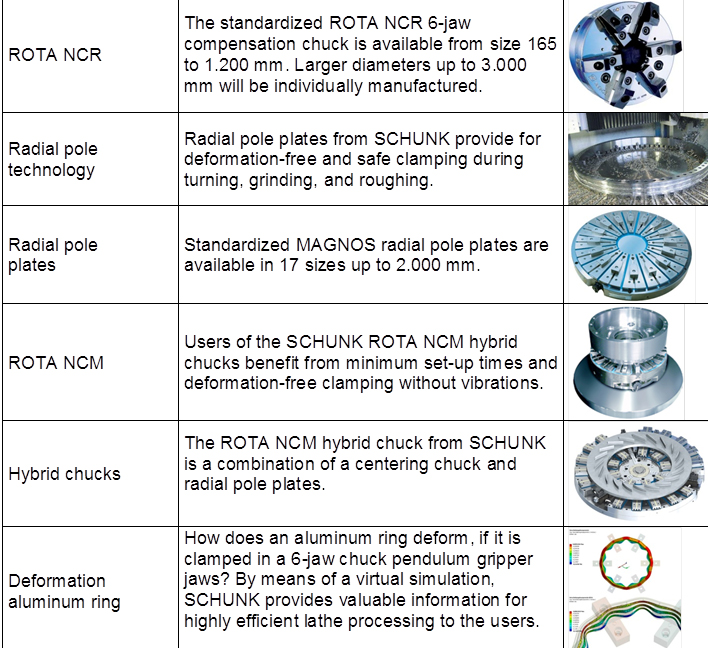
So-called hybrid chucks use the technology of a classic 3-jaw or 6-jaw centering chuck along with the technology of a radial pole plate. With these chucks, workpieces are automatically centered from the inside or outside and are quickly clamped without deformation. Used on grinding or turning machines with pneumatic or hydraulic actuation, hybrid chucks can reduce set-up times by up to 80 percent to boost productivity. (See Table 1 that follows just beneath this line)
VIRTUAL SIMULATION PAVES THE WAY FOR OPTIMUM CLAMPING
Virtual simulation can be very useful for selecting the correct clamping tool or device because it helps to develop the optimum combination of clamping tools and devices, the type of jaw design, clamping height, clamping force, and speed. In cases of complex geometries and high precision requirements, such as bearings, gears, turbo housings, cylinder heads, or brake rings, magnetic clamping technology produces impressive results.
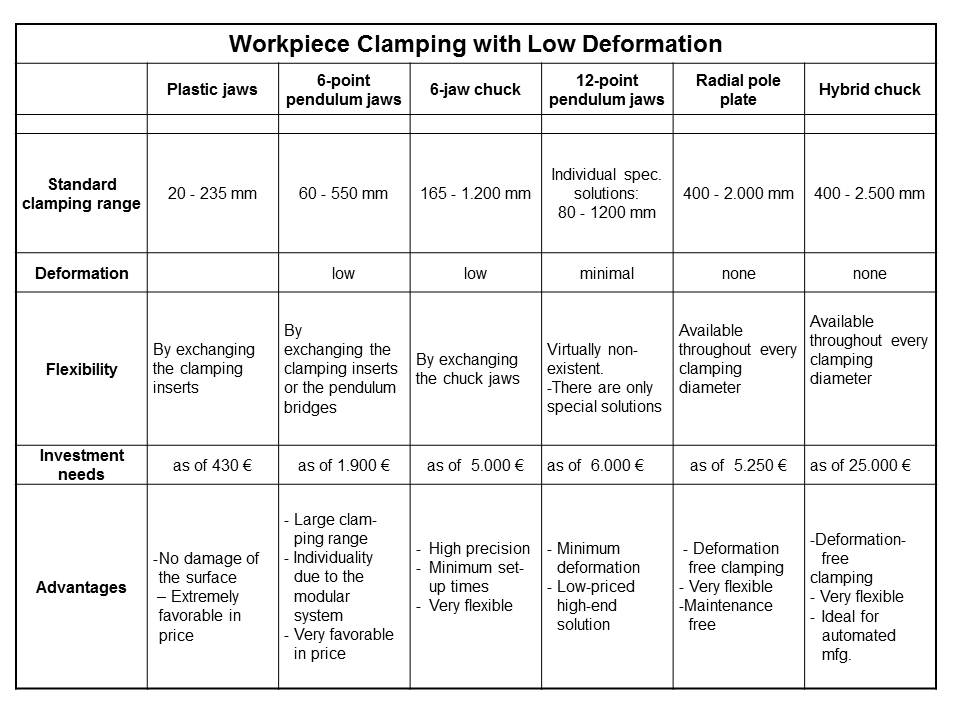
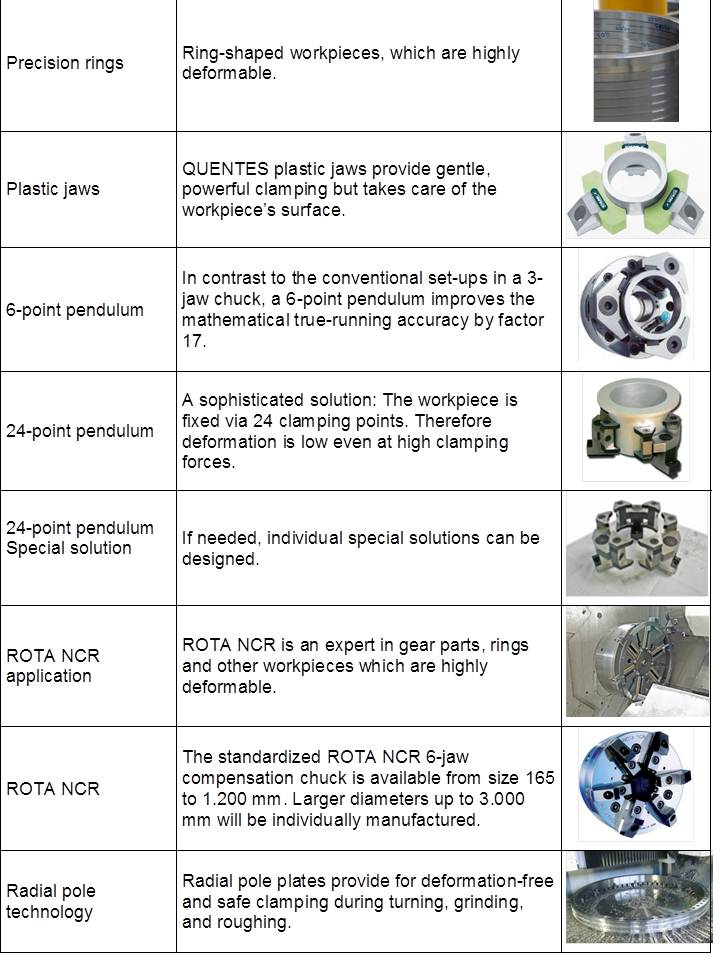
For example, the result of one virtual simulation shows that a component of a pump’s powertrain, which had been manufactured in three operations, can now be machined in two operations on a ROTA NCR 6-jaw compensation chuck. The roundness error at the fitting Ø 218 f7 (tolerance 0.048 mm) after clamping, turning, and machining amounted to 0.054 mm, which was outside the tolerated range. However, in a second simulation the speed was increased and the cutting data was adjusted to make the operation successful. The highly efficient combination of virtual simulation and 6-jaw compensation chuck provides an enormous cost savings for the user. (See Tables 2-3)


